---
title: "Tìm hiểu công cụ NCKH: Jupiter Notebook"
date: "2025-05-05T02:47:21.850Z"
status: "published"
---

# Tìm hiểu công cụ NCKH: Jupiter Notebook

<h2 dir="ltr">1. Jupyter Notebook l&agrave; g&igrave;?</h2>
<p dir="ltr">Jupyter l&agrave; một thuật ngữ được gh&eacute;p từ ba ng&ocirc;n ngữ lập tr&igrave;nh Julia, Python v&agrave; R.</p>
<p dir="ltr">Trước đ&acirc;y Jupyter Notebook c&oacute; t&ecirc;n l&agrave; IPython Notebook, đến năm 2014 t&aacute;ch ra khỏi IPython v&agrave; đổi t&ecirc;n th&agrave;nh Jupyter Notebook.</p>
<p dir="ltr">Jupyter Notebook&nbsp; l&agrave; một nền tảng t&iacute;nh to&aacute;n khoa học m&atilde; nguồn mở, bạn c&oacute; thể sử dụng để tạo v&agrave; chia sẻ c&aacute;c t&agrave;i liệu c&oacute; chứa code trực tiếp, phương tr&igrave;nh, trực quan h&oacute;a dữ liệu v&agrave; văn bản tường thuật.</p>
<p dir="ltr">Jupyter Notebook được coi l&agrave; m&ocirc;i trường điện to&aacute;n tương t&aacute;c đa ng&ocirc;n ngữ, hỗ trợ hơn 40 ng&ocirc;n ngữ lập tr&igrave;nh cho người d&ugrave;ng.</p>
<p dir="ltr">Với Jupyter Notebook, người d&ugrave;ng c&oacute; thể đưa dữ liệu, code, h&igrave;nh ảnh, c&ocirc;ng thức, video,.. v&agrave;o trong c&ugrave;ng một file, gi&uacute;p cho việc tr&igrave;nh b&agrave;y trở n&ecirc;n dễ d&agrave;ng hơn. Bạn c&oacute; thể vừa tr&igrave;nh chiếu vừa chạy code để tương t&aacute;c tr&ecirc;n đ&oacute;.</p>
<h2 dir="ltr">2. Lợi &iacute;ch của Jupyter Notebook</h2>
<p dir="ltr">Jupyter Notebook được viết bằng c&aacute;c ng&ocirc;n ngữ như Python, R v&agrave; Julia, nền tảng n&agrave;y hiện đang được sử dụng rộng r&atilde;i. B&ecirc;n cạnh đ&oacute;, Jupyter c&ograve;n tạo ra t&agrave;i liệu, trực quan h&oacute;a dữ liệu v&agrave; lưu trữ ch&uacute;ng một c&aacute;ch dễ d&agrave;ng hơn rất nhiều. Một số lợi &iacute;ch ch&iacute;nh m&agrave; Jupyter Notebook đem lại :&nbsp;</p>
<h3>2.1 Ph&acirc;n t&iacute;ch kh&aacute;m ph&aacute; dữ liệu (Exploratory Data Analysis)</h3>
<p dir="ltr">Jupyter cho ph&eacute;p người d&ugrave;ng xem kết quả của code in-line (m&atilde; inline) m&agrave; kh&ocirc;ng cần phụ thuộc v&agrave;o c&aacute;c phần kh&aacute;c của code.</p>
<p dir="ltr">Trong Notebook mọi &ocirc; của code c&oacute; thể được kiểm tra bất cứ l&uacute;c n&agrave;o, điều n&agrave;y đ&atilde; gi&uacute;p Jupyter trở n&ecirc;n kh&aacute;c biệt so với c&aacute;c IDE như Pycharm, VSCode. Việc Jupyter c&oacute; thể xuất code in-line đ&atilde; gi&uacute;p &iacute;ch rất nhiều trong qu&aacute; tr&igrave;nh ph&acirc;n t&iacute;ch kh&aacute;m ph&aacute; dữ liệu (EDA).</p>
<h3 dir="ltr">2.2 Bộ đệm dễ d&agrave;ng trong &ocirc; t&iacute;ch hợp</h3>
<p dir="ltr">Từng &ocirc; tự duy tr&igrave; trạng th&aacute;i hoạt động sẽ hơi kh&oacute;, nhưng với Jupyter, c&ocirc;ng việc n&agrave;y sẽ được thực hiện tự động. V&igrave; Jupyter lưu trữ kết quả hoạt động của mọi &ocirc; đang chạy, cho d&ugrave; l&agrave; code đang đ&agrave;o tạo m&ocirc; h&igrave;nh machine learning hay code đang tải xuống gigabyte dữ liệu từ một m&aacute;y chủ từ xa.</p>
<h3 dir="ltr">2.3 Độc lập ng&ocirc;n ngữ</h3>
<p dir="ltr">Jupyter Notebook ở định dạng JSON, v&igrave; thế n&oacute; được biết đến l&agrave; một nền tảng độc lập cũng như độc lập về ng&ocirc;n ngữ.</p>
<h3 dir="ltr">2.4 Trực quan h&oacute;a dữ liệu (Data Visualisation)</h3>
<p dir="ltr">Jupyter Notebook hỗ trợ trực quan h&oacute;a dữ liệu v&agrave; hiển thị th&ecirc;m một số đồ họa v&agrave; biểu đồ. Những điều n&agrave;y được tạo ra từ code với sự trợ gi&uacute;p của c&aacute;c m&ocirc; -đun như Matplotlib, Plotly hoặc Bokeh. Ngo&agrave;i ra, Jupyter c&ograve;n cho ph&eacute;p người d&ugrave;ng c&ugrave;ng chia sẻ code v&agrave; bộ dữ liệu hoặc thay đổi tương t&aacute;c với nhau.</p>
<h3 dir="ltr">2.5 Tương t&aacute;c trực tiếp với code</h3>
<p dir="ltr">Jupyter Notebook sử dụng "ipywidgets" packages, cung cấp cho người d&ugrave;ng giao diện chuẩn nhằm kh&aacute;m ph&aacute; sự tương t&aacute;c trực tiếp với code v&agrave; với dữ liệu. Người d&ugrave;ng c&oacute; thể chỉnh sửa v&agrave; chạy code, l&agrave;m cho code của Jupyter non-static.</p>
<p dir="ltr">Ngo&agrave;i ra, n&oacute; c&ograve;n cho ph&eacute;p người d&ugrave;ng kiểm so&aacute;t nguồn đầu v&agrave;o của code v&agrave; phản hồi lại trực tiếp tr&ecirc;n tr&igrave;nh duyệt.&nbsp;&nbsp;&nbsp;&nbsp;</p>
<h3 dir="ltr">2.6 C&aacute;c mẫu code t&agrave;i liệu</h3>
<p dir="ltr">Jupyter gi&uacute;p người d&ugrave;ng dễ d&agrave;ng giải th&iacute;ch từng d&ograve;ng code của họ với c&aacute;c phản hồi được đ&iacute;nh k&egrave;m. D&ugrave; trong code đ&atilde; c&oacute; đầy đủ c&aacute;c chức năng nhưng người d&ugrave;ng vẫn c&oacute; thể tăng th&ecirc;m sự tương t&aacute;c bằng c&aacute;c lời giải th&iacute;ch.</p>
<h2 dir="ltr">3. Hướng dẫn c&agrave;i đặt Jupyter Notebook</h2>
<h3 dir="ltr">3.1 C&agrave;i đặt Jupyter Notebook th&ocirc;ng qua Anaconda ( Phổ biến nhất )&nbsp;</h3>
<p dir="ltr">Đầu ti&ecirc;n, bạn h&atilde;y truy cập v&agrave;o trang web của Anaconda . Ở cột Windows, chọn phi&ecirc;n bản ph&ugrave; hợp (32bit hoặc 64bit) rồi tải xuống. (Như trong ảnh)&nbsp;</p>
<p dir="ltr">Link download : <a href="https://www.anaconda.com/download/success">https://www.anaconda.com/download/success</a></p>
<p dir="ltr"><img src="https://lh7-rt.googleusercontent.com/docsz/AD_4nXdxfwDSy---5U4LJkphao7v3wlFaSTGlDBBDb-qP1jpCQRQ7Sa1Qf-GKQv2zaduQQ81NoWtANTPqlhxLhdbvUWVPApUutXMpyAqGGm_FKWsri30xTjoKeGuJctN-P4nINrSatDj?key=TSGevjjemnCGY1mBzKT4IXB3" width="602" height="241"></p>
<p dir="ltr">Bước 2: Chương tr&igrave;nh sẽ bắt đầu c&agrave;i đặt, bạn h&atilde;y thực hiện theo chỉ dẫn tr&ecirc;n m&agrave;n h&igrave;nh để ho&agrave;n th&agrave;nh việc c&agrave;i đặt. Việc c&agrave;i đặt thường sẽ mất một v&agrave;i ph&uacute;t, bạn c&oacute; thể khởi chạy Jupyter Notebook sau khi qu&aacute; tr&igrave;nh c&agrave;i đặt ho&agrave;n tất.</p>
<p dir="ltr">Chi tiết về c&aacute;c bước c&agrave;i đặt, bạn tham khảo link dưới đ&acirc;y:</p>
<p dir="ltr"><a href="https://researchguides.uoregon.edu/library_workshops/install_anaconda">https://researchguides.uoregon.edu/library_workshops/install_anaconda<br><br></a></p>
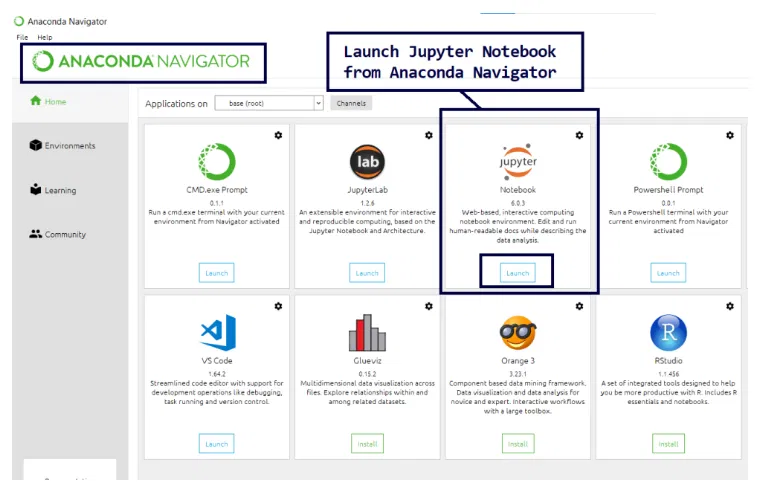
<p dir="ltr">Bước 3: Sau khi c&agrave;i đặt ho&agrave;n tất, bạn c&oacute; thể khởi chạy Anaconda Navigator. Từ Navigator nhấp v&agrave;o khởi chạy (Launch) trong tab Jupyter Notebook, sẽ được hiển thị b&ecirc;n dưới:</p>
<p dir="ltr"><img src="https://lh7-rt.googleusercontent.com/docsz/AD_4nXfk_cvjLE28l6lR-D-TPsBJJKycyEty0MyWQwza8OweTFFU-rqbvVC5kw4bCW1fRC47Q74NxHCl-LGYw2jb9ps1mBVMeCpT9cFIYZD656za0Nao9l3nYIxJOWgHaBo0vhoAqAgUpA?key=TSGevjjemnCGY1mBzKT4IXB3" width="602" height="334"></p>
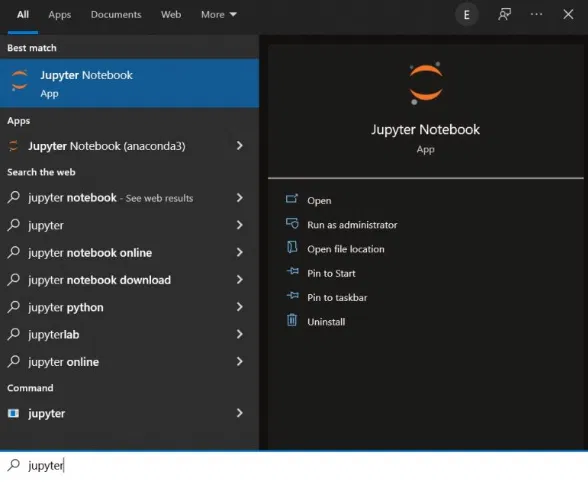
<p dir="ltr">Hoặc bạn c&oacute; thể sử dụng&nbsp; ph&iacute;m tắt&nbsp; để bắt đầu khởi chạy Jupyter Notebook trực tiếp, theo v&iacute; dụ như h&igrave;nh b&ecirc;n dưới:</p>
<p dir="ltr"><img src="https://lh7-rt.googleusercontent.com/docsz/AD_4nXeB7rkHTicA9wd_qBB-ylMf02iihq_mKIKBug8ZHL27-dr8eQ-cPzorJSLYfKE2e-_BYdkpOeyD9Yvr2oJ3zS9lpgh7JtePHjiYnPhKM8TA-AfxQCcqsYaJk6ZC8OqD_CMrQUX3ew?key=TSGevjjemnCGY1mBzKT4IXB3" width="588" height="482"></p>
<h3 dir="ltr">3.2 C&aacute;c c&aacute;ch c&agrave;i đặt kh&aacute;c</h3>
<p dir="ltr">Bạn đọc tham khảo ở 2 Link dưới đ&acirc;y :&nbsp;</p>
<p dir="ltr"><a href="https://www.geeksforgeeks.org/install-jupyter-notebook-in-windows/">https://www.geeksforgeeks.org/install-jupyter-notebook-in-windows/</a></p>
<p dir="ltr"><a href="https://200lab.io/blog/jupyter-notebook-la-gi">https://200lab.io/blog/jupyter-notebook-la-gi</a></p>
<h2 dir="ltr">4. Hướng dẫn sử dụng Jupyter Notebook cơ bản</h2>
<h3>4.1 Chạy Jupyter Notebook tr&ecirc;n Server</h3>
<p dir="ltr">Sau khi c&agrave;i đặt xong Jupyter Notebook trong c&aacute;c bước ở tr&ecirc;n, ch&uacute;ng ta c&oacute; thể bắt đầu chạy Jupyter bằng c&acirc;u lệnh trong Terminal hoặc Command Prompt:</p>
<p dir="ltr"><img src="https://lh7-rt.googleusercontent.com/docsz/AD_4nXfEsaaxkpvkr4LMemrQpjJ1xg8SkZNasSG0atOrAB5z1TC06CDTS51egW8jrYMogroYgG3OyIoyING9HVRIl-n21KPFp7UN60hZ8VcbGKgaCKttGJCj8he4r9Cth19VrmQPD49I?key=TSGevjjemnCGY1mBzKT4IXB3" width="602" height="87"></p>
<p dir="ltr">Sau đ&oacute; nhập lệnh Jupyter Notebook v&agrave; chương tr&igrave;nh sẽ khởi tạo một m&aacute;y chủ cục bộ tại LocalHost: 8888 (hoặc một cổng được chỉ định kh&aacute;c).</p>
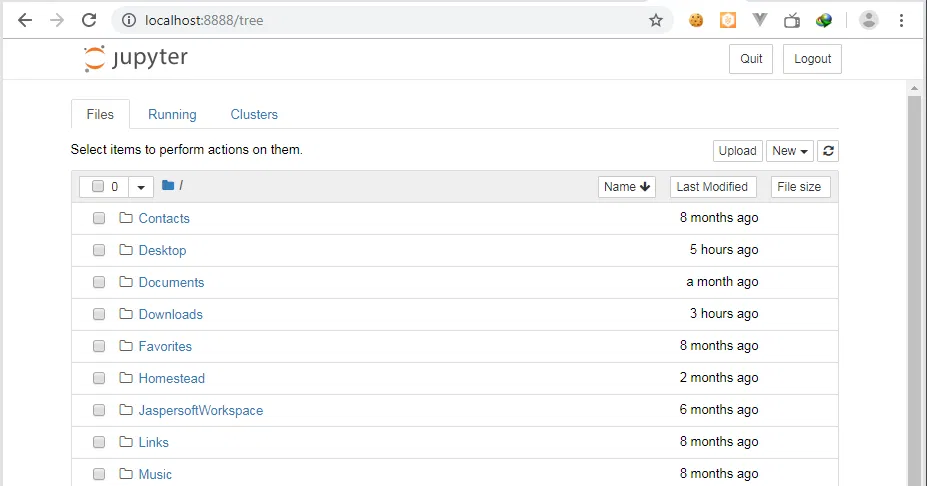
<p dir="ltr">Ngay lập tức, tr&igrave;nh duyệt sẽ bật ra với đường dẫn http://localhost:8888/tree như h&igrave;nh dưới đ&acirc;y:</p>
<p dir="ltr"><img src="https://lh7-rt.googleusercontent.com/docsz/AD_4nXc0IBOmJGIOdBwrZuB9GeS-551lyZ4S89ZIIsA8aO_T0PRrmzzI9a2whKqn3C8QNKOe7MR6N_28MNfMfNVmYI_lp6ZHJde3YLgFXWgnWRraGXwjqo1tGmOX45CjbgNaMRVykSCE?key=TSGevjjemnCGY1mBzKT4IXB3" width="602" height="316"></p>
<h3 dir="ltr">4.2 Giao diện tr&ecirc;n Jupyter Notebook</h3>
<p dir="ltr">Bạn đang ở trong giao diện Jupyter Notebook v&agrave; bạn c&oacute; thể thấy tất cả c&aacute;c tệp c&oacute; trong thư mục của m&igrave;nh. Nếu bạn muốn xem một thư mục, bạn h&atilde;y t&igrave;m n&oacute; trong danh s&aacute;ch c&aacute;c tệp v&agrave; nhấp v&agrave;o n&oacute; để mở thư mục đ&oacute; l&ecirc;n.</p>
<p dir="ltr"><img src="https://lh7-rt.googleusercontent.com/docsz/AD_4nXdGUCFM6yYytJRy751iG36Jy_28F3MWMufy_osa6hBvwQwF0KP5GOl_wqFQiuGI3ahVFswqCwFkwKsftsNGAwGC5hnysdLWZBZ7HuAMNhhK-EVwy0X1m9ISnx5Ghzg0yBvJeVn5MQ?key=TSGevjjemnCGY1mBzKT4IXB3" width="285" height="190"></p>
<p dir="ltr">Jupyter Notebook của bạn sẽ được mở trong tab mới.</p>
<p dir="ltr">Nếu bạn quay lại dashboard, bạn sẽ thấy file mới Untitled.ipynb v&agrave; một số văn bản m&agrave;u xanh l&aacute; c&acirc;y cho điều đ&oacute; cho bạn biết l&agrave; Jupyter Notebook của bạn đang chạy.</p>
<h3 dir="ltr">4.3 L&agrave;m việc với Notebook</h3>
<p dir="ltr"><img src="https://lh7-rt.googleusercontent.com/docsz/AD_4nXf0HSDPgBK2o6F6myNBT5KTXpa2sd5AkI0AMJ8TpvISrtHGgZUZ7B-G68opqFHSIx-q5qg8Bgsk1VMpvuI6hQn8PSZrcJtqr4mrKrleyOsH0dV5Na2IExs_zqqhSe2-JVIwGAz6?key=TSGevjjemnCGY1mBzKT4IXB3" width="602" height="284"></p>
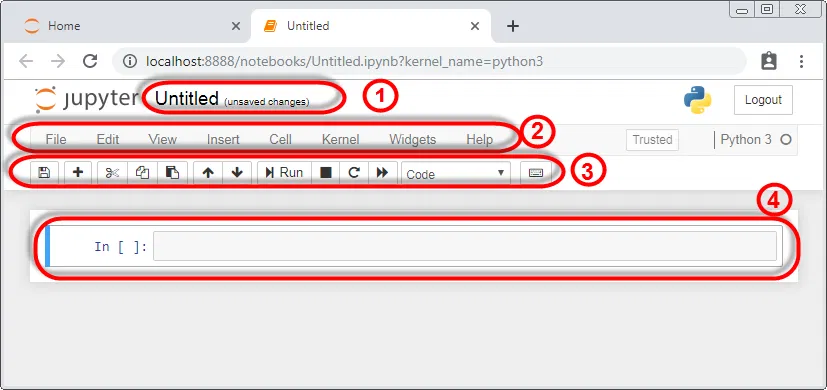
<p dir="ltr">Nội dung t&agrave;i liệu chứa c&aacute;c cell c&oacute; nội dung l&agrave; code hoặc markdown, đ&acirc;y l&agrave; v&ugrave;ng ch&uacute;ng ta sẽ l&agrave;m việc ch&iacute;nh.</p>
<p dir="ltr">Một notebook bao gồm nhiều cell (&ocirc;). Khi tạo mới một notebook, bạn lu&ocirc;n được tạo sẵn một cell rỗng đầu ti&ecirc;n.</p>
<p dir="ltr">C&oacute; hai thuật ngữ m&agrave; bạn n&ecirc;n biết l&agrave; Cell v&agrave; Kernel:</p>
<p dir="ltr">Kernel: l&agrave; một "c&ocirc;ng cụ t&iacute;nh to&aacute;n" thực thi code c&oacute; trong Jupyter Notebook</p>
<p dir="ltr">Cell: l&agrave; chỗ chứa văn bản được hiển thị trong Jupyter Notebook hoặc code được thực hiện bởi Kernel của Jupyter Notebook.</p>
<p dir="ltr">4.3.1 Cell</p>
<p dir="ltr">C&oacute; hai loại &ocirc; ch&iacute;nh m&agrave; c&aacute;c bạn cần biết:</p>
<p dir="ltr">Code cell chứa code sẽ được thực hiện trong kernel. Khi code chạy, Jupyter Notebook sẽ hiển thị đầu ra b&ecirc;n dưới code cell đ&atilde; tạo ra n&oacute;.</p>
<p dir="ltr">Markdown cell chứa văn bản được định dạng bằng c&aacute;ch sử dụng Markdown v&agrave; hiển thị đầu ra của n&oacute; tại chỗ m&agrave; Markdown cell chạy.</p>
<p dir="ltr">Cell đầu ti&ecirc;n trong Notebook mới lu&ocirc;n l&agrave; code cell.</p>
<p dir="ltr">Ch&uacute;ng ta sẽ c&ugrave;ng thử nghiệm bằng một v&iacute; dụ cổ điển sau: Nhập print('Hello World!') v&agrave;o cell v&agrave; nhấn n&uacute;t Run tr&ecirc;n thanh c&ocirc;ng cụ hoặc nhấn Ctrl + Enter.</p>
<p dir="ltr">Ch&uacute;ng ta sẽ c&oacute; kết quả tr&ocirc;ng như thế n&agrave;y:</p>
<p dir="ltr"><img src="https://lh7-rt.googleusercontent.com/docsz/AD_4nXea4jzxJAa7P0SoFVcJhOL7-LetZ-ahUeoEcDpZCRktoPkT9ubcd0ZEcLh_DfBSxgm8eE9IagLW3xvVfgINQ-rGK90jW3UMM5XaRGoddurikZWF7zZDsHM4PGTZ61nKixix6Rnh?key=TSGevjjemnCGY1mBzKT4IXB3" width="602" height="35"></p>
<p dir="ltr">Khi ch&uacute;ng ta bắt đầu chạy cell, đầu ra của n&oacute; được hiển thị b&ecirc;n dưới v&agrave; nh&atilde;n b&ecirc;n tr&aacute;i của n&oacute; sẽ thay đổi từ In [ ] th&agrave;nh In [1].</p>
<p dir="ltr">Đầu ra của code cell cũng tạo th&agrave;nh một phần t&agrave;i liệu, đ&oacute; l&agrave; l&yacute; do tại sao bạn c&oacute; thể thấy n&oacute; trong b&agrave;i viết n&agrave;y. Bạn c&oacute; thể thấy sự kh&aacute;c biệt giữa code cell v&agrave; Markdown cell v&igrave; c&aacute;c code cell c&oacute; nh&atilde;n (label) ở b&ecirc;n tr&aacute;i nhưng c&ograve;n Markdown cell th&igrave; kh&ocirc;ng c&oacute;.</p>
<p dir="ltr">In trong nh&atilde;n chỉ đơn giản l&agrave; viết tắt cho "Input".</p>
<p dir="ltr">Chạy lại cell v&agrave; nh&atilde;n l&uacute;c n&agrave;y sẽ đổi th&agrave;nh [2], v&igrave; b&acirc;y giờ cell đ&atilde; chạy lần thứ hai tr&ecirc;n kernel, điều n&agrave;y sẽ l&agrave;m mọi thứ trở n&ecirc;n r&otilde; r&agrave;ng v&agrave; hữu &iacute;ch hơn.</p>
<p dir="ltr">Từ thanh menu, nhấp v&agrave;o Insert v&agrave; chọn Insert Cell Below để tạo một code cell mới b&ecirc;n dưới:</p>
<p dir="ltr"><img src="https://lh7-rt.googleusercontent.com/docsz/AD_4nXdmZkH9E3BxUJTd2RU3n-bedeHaIKPL9g99jP70J5Omp6kJwoWOVjnYjvmw6hFe8lfEajcn4BNSeviR5I3SZA3vaN3GJzsnh4wgwNSn2mKO4h94rouKWOe3zt9NQgC6953QYJWDFQ?key=TSGevjjemnCGY1mBzKT4IXB3" width="602" height="47"></p>
<p dir="ltr">Đầu ra của một cell c&oacute; thể xuất ph&aacute;t từ bất kỳ dữ liệu văn bản n&agrave;o được thực hiện trong cell, n&oacute; c&oacute; thể l&agrave; một biến, lệnh gọi h&agrave;m. V&iacute; dụ:</p>
<p dir="ltr"><img src="https://lh7-rt.googleusercontent.com/docsz/AD_4nXfXjRhXO6mBdyZKXSLCT4I8mGZlRYhndAdp_04wd2ueqRnn7ReOq52zIV9FSs2jUV7UdQVkgmFWzLEVawloHG9ZMPxf8ujhmCkNrTZVpzJN-7sESyjFrKnJZMep5HzUfo-f52Nq3g?key=TSGevjjemnCGY1mBzKT4IXB3" width="602" height="80"></p>
<p dir="ltr">4.3.2 Kernel</p>
<p dir="ltr">Khi c&oacute; một code cell chạy, th&igrave; code đ&oacute; sẽ được thực thi trong kernel. Trạng th&aacute;i của kernel vẫn lu&ocirc;n tồn tại theo thời gian v&agrave; giữa c&aacute;c cell - n&oacute; li&ecirc;n quan đến to&agrave;n bộ t&agrave;i liệu.</p>
<p dir="ltr">C&oacute; một số t&ugrave;y chọn cực kỳ hữu &iacute;ch từ menu kernel:</p>
<p dir="ltr">Khởi động lại (Restart): Khởi động lại kernel n&oacute; sẽ x&oacute;a tất cả c&aacute;c biến đ&atilde; được x&aacute;c định.</p>
<p dir="ltr">Khởi động lại v&agrave; x&oacute;a đầu ra (Restart v&agrave; Clear Output): Sẽ x&oacute;a đầu ra được hiển thị b&ecirc;n dưới c&aacute;c code cell của bạn.</p>
<p dir="ltr">Khởi động lại v&agrave; chạy tất cả (Restart &amp; Run All): Sẽ chạy lại tất cả c&aacute;c cell của bạn theo thứ tự từ đầu đến cuối.</p>
<p dir="ltr">C&aacute;c chức năng kh&aacute;c, bạn đọc t&igrave;m hiểu th&ecirc;m tại :&nbsp;</p>
<p dir="ltr"><a href="https://www.geeksforgeeks.org/install-jupyter-notebook-in-windows/">https://www.geeksforgeeks.org/install-jupyter-notebook-in-windows/</a></p>
<p dir="ltr"><a href="https://200lab.io/blog/jupyter-notebook-la-gi">https://200lab.io/blog/jupyter-notebook-la-gi</a></p>